DIY or Die Trying: 25 DIY Home Projects That Might Just Save Your Sanity
DIY Home Projects
Now, I’m no stranger to the occasional DIY melodrama. There was that time I tried to change a faucet and ended up with a fountain in the middle of my bathroom. Or when I took on painting the living room and somehow became a temporary living art piece smudged in shades of ‘Eggshell’ and ‘Misty Morning.’ But let’s face it, going the do-it-yourself route to spruce up your homestead isn’t just about saving a few bucks. It’s about crafting a personal odyssey, peppered with triumphs and yes, a handful of “I’ve got this—oh wait, I do not got this” moments.
Whether you’re tacking on straightforward home improvements or diving headfirst into more uncomplicated home projects, each completed DIY project carries a badge of honor. There’s a therapeutic zest in these home DIY ideas that keeps you chucking along. So grab your toolkit, because we’re about to explore some DIY home projects that don’t just beautify your space—they’re an outright lifeline to maintaining your cool, your sanity, and claiming the bragging rights that, indeed, you did it all by yourself.
Key Takeaways
DIY home projects can go beyond home renovations—think mental wellness meets home repair.
Embracing easy home tasks builds confidence and fosters a can-do mindset within your own walls.
Straightforward home improvements are a mix of fun, chaos, and a sprinkle of self-discovery.
Uncomplicated home projects can lead to complex feelings of accomplishment and satisfaction.
Whether it’s a do-it-yourself task or a full-blown DIY task spree, the journey can be as rewarding as the destination.
A sense of humor is an essential tool in any DIY project—sometimes it’s the fix-all you really need.
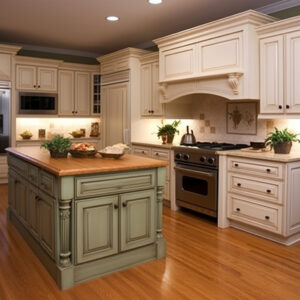
Getting Creative with Kitchen Units and Cupboards
My love affair with my own kitchen began when I realized that a few artful touches could transform those ’70s cabinets into something out of a modern home interior magazine. It’s astonishing how a splash of paint
and some new handles can breathe new life into those weary kitchen units. It’s a home transformation tale that makes me want to open the doors to my kitchen cupboards just for kicks.
The Art of Repurposing Old Furniture
Here’s the deal—those kitchen cupboards are not just storage boxes attached to your wall; they’re potential masterpieces waiting to be unveiled. I’ve seen the light, and it’s gleaming off the hinges of freshly painted cabinets. Forget those cookie-cutter kitchen storage solutions. Let’s talk about turning the mundane into the spectacular with a little ingenuity and a can of paint.
Remember, “Ugly” is just a coat of paint away from “I can’t believe this used to be an old dresser!”
Scour thrift shops for sturdy, quality wood furniture with shapes that whisper “kitchen chic.”
Choose your palette: think ‘Avocado Toast’ green or ‘Salted Caramel’ beige to stay trendy.
Snag some hardware that makes a statement—think brass for warmth, chrome for cool.
And voila! Those archaic kitchen cupboards that reeked of the past are now the talk of the future—yourhome transformation future, to be precise.
Maximizing Storage with DIY Shelving
Kitchen spatial woes be gone! Installing new shelves can feel like adding a walk-in closet to your culinaryly challenged quarters. You see, sometimes kitchen units feel like they shrink (they don’t, I checked). When the clutter mounts, it’s time to fight back with vertical storage savviness.
Shelving Solution
Benefits
Style Notes
Open Shelving
Accessible, creates an airy feel
Perfect for showing off those artisanal ceramics or cookbooks you never open
Spice Racks
It keeps flavors at your fingertips
Charming when paired with identical glass jars and hand-labeled tags
Hanging Pots/Pans
Freestanding kitchen units rediscover their counter space
Industrial look, great if you’re into that ‘chic factory’ vibe
Under-Cabinet Racks
A no-brainer for extra mug and stemware storage
Sleek and stealthy, like secret compartments in a spy movie
Whether you’re displaying grandmama’s china or just trying to find a spot for that extra-large colander, elevating your kitchen storage game is a move straight out of the DIY home renovation playbook. So roll up those sleeves, install that light fixture you’ve been avoiding, and let the shelving begin!
Pull Off a Home Makeover with a Statement Wall
It’s no secret that creating a statement wall can be the centerpiece of a stellar home makeover. Having gone down this road myself, I’ve wall-papered my way into some stunning successes and, admittedly, a few comical corners. The joy of a feature wall is in its ability to turn a bland area into a breathtaking focal point that showcases not just your design prowess but your unique personality as well.
Choosing the right focal wall is akin to picking the lead actor in your home’s theatrical debut. It’s not about picking any wall, but the one that commands attention the moment you step into the room. It could be the wall you face when you enter, or the one with the least amount of windows and doors. Once chosen, the adventure of converting it into a statement wall begins.
Now, for the main act: apply wallpaper. I’ve seen the sweat beads form on the foreheads of the brave souls ready to hang wallpaper. Believe me, the mix of excitement and dread is real. But armed with the right pattern and the patience of a saint, you can definitely pull it off. Just remember, wallpaper isn’t your only option. A bold paint color can also bring a wall from mundane to hey-look-at-me with a few coats.
As I’ve learned, the biggest misstep is not in choosing a dramatic pattern or eye-popping color, but in ignoring the prep work. As they say, ‘It’s all in the prep’.
Ensure your wall is smooth and clean; any imperfections can become even more noticeable once adorned.
Measure twice, cut once. This adage becomes gospel when you’re dealing with repeated patterns.
Patience is not a virtue; it’s a necessity. Rush, and you’ll surely have a story highlighted by mismatched patterns or peeling edges.
To truly bring your accent wall to life, you can’t forget the final touches. Think lighting that complements the colors, artwork that brings out the subtleties of the design, or shelving that adds depth and character. Below is a quick guide to ensuring your statement wall hits all the right notes:
Element
Consideration
Impact on Statement Wall
Lighting
Highlight or downplay textures and colors
Creates ambiance and mood that complement the wall
Artwork
Coordinate with wallpaper pattern or wall color
Adds a personal touch and augments the wall’s theme
Shelving
Strategic placement without overcrowding
Brings functionality and adds a 3D effect to the wall
In the grand tapestry of your home makeover, a statement wall can serve as that pivotal plot twist that takes your decor narrative from lackluster to blockbuster. Now, before you don your DIY cape, remember my mantra: A statement is only as good as the thought behind it. Choose wisely, prepare vigorously, and execute patiently. Your walls have stories to tell; it’s time to give them a voice.
Refurbish Your Home Facade for Maximum Curb Appeal
Oh, the home facade—one might compare it to the smile of your house. And just as we wouldn’t show up to an interview with spinach lodged between our teeth, we can’t let our abodes flash a façade that screams anything but charm. So, I rolled up my sleeves and set out to claim that elusive title of the neighborhood’s best-dressed exterior, aiming for maximum curb appeal. Here’s the scoop on how I added a sprinkle of DIY magic to transform my home’s exterior.
DIY Exterior Paint Refresh
I’ve had my share of comical capers when it comes to exterior home styling. Picture me: a hopeful Picasso armed with a brush, a ladder, and the kind of enthusiasm that’s usually followed by a series of fortunate (or unfortunate) events. The mission was clear: a paint refresh to color the home facade with vibrancy. And sure, not all heroes wear capes; some wield paint rollers, right?
Remember, when it comes to DIY home improvements, it’s less about the swiftness of the brushstroke and more about the bonding with your bristles.
Start with selecting the right paint: Opt for high-quality latex paint that holds up against Mother Nature’s mood swings.
Color your world, but also your trim. Contrasting trim colors can truly make your home facade pop.
Don’t forget the prep: power wash the old facade and tend to those cracks—it’s all in the details.
And, if I may offer one sliver of wisdom, always check the weather forecast. There’s nothing quite like a sudden downpour to transform your DIY home upgrades into an abstract art installation.
Installing Outdoor Lighting Fixtures
The path to maximum curb appeal is invariably lit with some strategic outdoor lighting. Nothing turns a nighttime home exterior from ‘meh’ to ‘magnificent’ faster than a well-placed light fixture. And if you’re angling for that ever-so-sought-after number 5 on the ‘Best Lit Facades of the Suburb’ list, then strap in for some electrifying storytelling.
Highlights the dramatic elements of your home’s architecture
Pathway Lights
An ornamental touch to the exterior walkway
Guides family and guests along walkways safely
Creates a magical breadcrumb trail to your door
Motion-Activated Floodlights
Dissuades potential skulking critters
Startles unwanted visitors with a burst of light
Automated convenience for that ‘someone’s always home’ illusion
But here’s the real kicker: installing a light fixture doesn’t just enhance your home’s nighttime appeal; it can be a rite of passage. Remember to mount the light fixture securely, respecting the sanctity of your home’s wiring. And when in doubt, consult a professional—there’s DIY and then there’s ‘DI-Why did I think I was an electrician?’
In closing, shovel out those old color swatches and dust off those gardening gloves. Between paint refreshes, mounting new lighting, and ensuring that the exterior walkway doesn’t lead your guests astray, the pursuit of home upgrades and maximum curb appeal can be one of the most gratifying endeavors. Here’s to your home exterior echoing the echo of good laughs and a job well done.
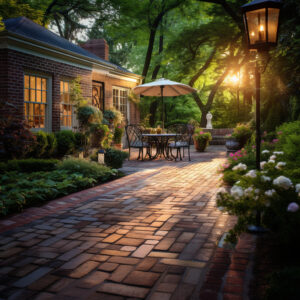
Transform Your Home Outdoor Area into a Sanctuary
There I was in my own little slice of the suburban wild, surrounded by unkempt shrubbery and a hammock suspended between two trees like a giant’s disheveled sling. Yes, my friends, the quest to turn a chaotic backyard into an outdoor sanctuary has begun. With shears in hand and visions of a landscaped haven dancing in my mind, the journey to create a serene alcove from the mundane outside home space was full of promise and punctuated by a few… well, let’s call them learning opportunities.
I often say the difference between a tangle of nature and an outdoor temple of tranquility is a well-placed garden path and the will to tidy something, sort something, until it all makes sense.
Moving beyond the haphazard arrangement of patio furniture and the wild conspiracy of weeds, I laid out a plan. It was one to not only reclaim the territory that was rightfully ours—or at least, according to the property deeds—but to imprint upon it a respite-inducing design that lured one outdoors with its charm.
The foundation of any peaceful outdoor sanctuary is the harmonious blend of flora and hardscape. Imagine a garden path, winding and beckoning, promising secrets and solace around every bend. The first step in crafting such a landscape is to sort through the myriad of greenery, identifying the keepers, the goners, and the just-need-a-little-love.
Prune with purpose: Decide which plants enhance tranquility and which only contribute to chaos. Trim, snip, and sculpt until you can practically hear each shrub sigh in relief.
Think textures and layers. Set your sights on creating a leisurely stroll rather than a sprint. Intermingle soft groundcovers with bold structural plants, playing with heights and hues.
Define with edges: Neatness counts. Crisp lines between beds and walkways signal a tended, tranquil space rather than a rowdy outdoor rave.
Next on your sanctuary construction list, consider the hardscapes. That’s right, echo the natural beauty with stone, wood, or other earthy materials to construct your garden path. I set about paving, piece by painstaking piece, a walkable work of art—not just a means to navigate but a feature to admire.
Stepping Stones
Material
Visual Appeal
Practicality
Flagstone
Rustic blends well with greenery
Durable and relatively easy to install
Crushed Gravel
Soft, informal appearance
Low cost and low maintenance
Stepping Stones
Whimsical, individual shapes create character
Allow grass or moss to grow in between for a green look
Brick Pavers
Traditional, classic patterns and tones
Offers substantial footing and historic charm
Let us not forget the final touches. These are what separate your outdoor area from just another backyard—that perfect swing under the oak tree, the fountain that chimes in with the birds, or the pergola that frames the sunset so perfectly you’d swear it was designed by the heavens themselves.
String up the lights: Nothing says ‘enchanted evening’ like fairy lights twinkling above.
Fire pit gatherings: Install a fire pit for warmth, camaraderie, and the age-old tradition of toasting marshmallows.
The sound of water: A small pond or a bubbling fountain melds the sound of water into your serene soundtrack.
In the end, it’s about creating that home outdoor area where every element invites you to breathe a little deeper, smile a little broader, and sink into the stillness that now resides where once stood disarray. And if a hammock installation results in an impromptu dirt nap, consider it an integral part of the process—a reminder that to achieve a state of sanctuary outdoors, one must occasionally become one with the earth, quite literally.
Building an Outdoor Pathway on a Budget
There’s a particular kind of victory that comes with completing home renovations without breaking the bank, and that’s precisely the triumph I felt after constructing an affordable yet stylish outdoor pathway. It’s a journey of tough choices, dollar-saving techniques, and that moment when you step back and realize, “Hey, I didn’t just organize something; I crafted a veritable work of art with my own two hands.”
Choosing Materials for Durability and Style
When it comes to selecting materials for your garden path, there’s a delicate balance to strike between endurance against the elements and visual charm. Invite your neighbors over for a gander, and you want them to say, “Is this the eighth wonder of the world or just your backyard?” Not that I’m counting, but that’s a sentiment worth striving for—trust me. Let’s dive into the available materials that can sustain the test of time, weather, and hops from little Timmy’s basketball.
I’ve learned that creating a durable exterior walkway doesn’t mean you have to remortgage your house. You can achieve grandeur through simplicity; you just need to know where to look.
Pavers: These are little slices of Eden when it comes to pathways. With a range of materials and styles, pavers let you design a pattern that can patently scream ‘unique’.
Concrete: It’s the unsung hero of pathways. Lay down some imaginative molds and voila!, You’ve got yourself a faux-stone aisle at a fraction of the cost.
Gravel: little rocks, huge impact. They’re inexpensive and, if you lay a solid edging, can shape your walkway quite marvelously.
Nevertheless, foreseeing the costs and making sure your money is poured into a mold of smart choices is paramount. Below, I lay out not only the materials but also their economical and stylish merits for all my fellow savvy builders out there.
Material
Cost
Style
Longevity
Concrete Pavers
Affordable
Versatile designs
Excellent resilience
Crushed Stone
Cost-effective
Natural, rustic look
Good with proper drainage
Brick
Moderate
Timeless charm
Very durable, but beware of slippery surfaces
Stepping Stones
Varies
Whimsical and creative layout
It depends on stone type
Gravel
Cheapest
Casual and flexible for shaping
Requires maintenance to stay put
Remember, transforming your home’s outdoor area doesn’t necessitate a Herculean budget. A dash of creativity, comparison shopping, and sweat equity are enough to organize a remarkable garden path. They say Rome wasn’t built in a day, but I’ve never heard anyone mention how fast their garden path was laid down. Take it from me: you can build your own cobblestone road to somewhere amazing—just do it one shrewd, well-planned step at a time.
Creating a Functional Home Workstation
Ah, the home workstation—a place where brilliance and bedlam often collide. If your house workspace resembles a warzone where the printer is holding the stapler hostage and the mouse is lost in a tangle of cords, then stick around. I’ll be your guide through the treacherous jungles of cable management and the murky swamps of ergonomic setups, all to emerge with a streamlined, if not smartly designed, home-based office.
Let’s begin with the cardinal rule: every inch of your domestic office must earn its keep. I started by thumb-wrestling with the random paraphernalia that had no business occupying premium real estate on my desk. Toss or relocate—be ruthless! It’s like home workspace feng shui; if it doesn’t spark productivity, it’s got to go.
Identify your main tools: Laptops, monitors, and stationary—these are your desk’s VIPs.
Abandon the all-in-one printer if it’s just a paperweight 98% of the time. Prioritize your actual needs.
Adopt storage solutions that are as stylish as they are practical. Think floating shelves for vertical appeal.
Sitting is the new smoking, they say, so it’s high time we made chairs that don’t feel like conspiracy against our spines. My quest for the ergonomically sublime led me down a road paved with more adjustment levers and lumbar support options than I knew existed.
Once your physical tools are in check, let’s talk tech. Cable management is a beast, and my battle scars are testament to it. I’ve been to the abyss and back, armed only with zip-ties and determination. The goal? A home workstation where you can’t play “connect the cords” with the sprawling mass of black spaghetti beneath your desk
Cable Management Solution
Pros
Cons
Style Factor
Cord Clips
Keeps cables sorted and accessible
Only good for small bundles
Minimalistic charm
Desk Grommet
Directs cords through tabletops
Requires drilling holes
Sleek, but needs commitment
Cable Sleeve
Tidy, unified cable runs
Changing cables is a hassle
A clean look hides the chaos
Under-Desk Tray
Off-the-floor cable containment
Can be an eyesore if not installed well
Industrial, functional vibe
And finally, tailor your tech to your lifestyle. In my quest for the ideal home workspace, I’ve found peace in wireless gadgets. The fewer cords, the fewer opportunities for an accidental tug-of-war with my feet.
A wireless mouse and keyboard make for a nomadic nirvana.
Invest in a decent pair of headphones with a mic—double points if they’re Bluetooth.
Don’t skimp on the webcam; your face deserves more than potato quality for those video calls.
In the melodious crescendo of setting up my domestic office, the highlight—an adjustable standing desk—brought a standing ovation from my knees and back. The ability to alternate between standing and sitting is a game-changer for both your health and attention span.
So go on, reclaim that corner of your abode, and transform that house workspace into a home workstation that hums with efficiency and perhaps, just perhaps, a little bit of your unique flair. Because, let’s be honest, there’s something immensely satisfying about coining the phrase “I’ll be working from home today” and actually looking forward to it.
Enhance Your Home Interior with Stylish DIY Decor
Once upon a less stylish time, my abode was a gallery of store-bought sameness. But then sparks of inspiration hit, and my DIY journey through home interior ideas began. Applying a coat of creativity, I’ve learned that crafting homemade art pieces lends my living space a narrative as eclectic as it is personal. It’s time to dive into the world of interior home styling and indoor home decor, all while keeping the bank account firmly in the black.
Homemade Art Pieces That Tell a Story
Now, let’s chatter about channeling your inner Da Vinci for some truly narrative-inducing DIY home decor. I’m talking about art with a backstory, a vibe, or a something-said-at-dinner party that resonates through every brushstroke or chiseled corner. It’s about augmenting your home interior design not just with objects but also with emotions and memories layered in pigment and texture.
Creating art is like whispering secrets into the canvas – it’s intimate, daring, and downright therapeutic.
I won’t fib and paint a tale where every project was a Monet in the making. Trust me, for every gallery-worthy concoction, there’s a DIY darling that’s more… ‘abstract unintended.’ But it’s the blunders mixed with the victories that truly make your space unequivocally yours—a veritable museum of trial, error, and triumphs.
Sift through the scrapyard of past projects for materials—a piece of broken tile, a strip of vintage fabric, a hint of beloved but chipped china.
Embrace that sentimental artifact that’s been gathering dust and make it the centerpiece of your next masterpiece.
Play with textures and colors that speak to your soul; mix the oil with the watercolor if you must (metaphorically, of course).
But hey, before you dive headfirst into the paint pot, let’s staple down some practical inspirations. A DIY project can be as straightforward as a series of shadow boxes housing your personal knick-knacks or as ambitious as a mural cascading down your stairwell.
DIY Art Project
Supplies Needed
Personal Story Potential
Time Investment
Custom Shadow Boxes
Shadow box, sentimental items, mounting tools
Tell your unique story with every item
1-3 hours
Hand-Painted Canvas
Canvas, acrylics, brushes (and a dash of courage)
Transform your memories into abstract hues
2–5 hours (plus drying time)
Repurposed Furniture Art
Old furniture, paint, sandpaper, and fearless imagination
Every scratch becomes part of the lore
Varies, but a weekend project mostly
DIY Wall Mural
Wall space, projectors, paint, patience
Your wall becomes a page from your diary
A week, give or take, based on complexity
Within these walls, every DIY project blends seamlessly into the ninth wonder of the world—your personally styled sanctuary. After all, those handmade art pieces don’t just fill spaces; they narrate epic tales of glue gun mishaps, misjudged color choices, and serendipitous design revelations. And just like that, your living quarters don whispers of stories that echo with every admiration-filled ‘ooh’ and ‘ahh’ from visitors.
Restyle with homemade candle holders; they cast shadows that dance with your past, and they’re a great reminder that even the darkest shadows can create beautiful light.
Revamp old jars with a touch of paint and a sprinkle of creativity—it’s not trash; it’s an artisanal vase now.
Frame your child’s first (or hundredth) macaroni art, because that’s what real treasure looks like, folks.
In closing, remember that turning a house into an art haven through home styling doesn’t demand a king’s ransom. Rather, it’s about celebrating those misfit artifacts from garage sales, the natural-born sculptors we all are with a bit of clay, and yes, even the ninth reincarnation of your stained glass endeavor. It’s all part of the grand design: your own bespoke, utterly original, and irreplaceably heartwarming indoor home decor.
Increase Your House Worth with Simple Home Restructuring
Embarking on home remodels can be akin to navigating a labyrinth designed by an especially crafty Minotaur. There are walls to rethink, hidden costs ready to pounce, and the ever-looming question: will this endeavor truly bolster my house’s worth? Spoiler alert: Even the most unassuming home restructuring projects can indeed escalate your property’s value and, in extension, your property equity.
During one of my own domestic refurbishments, I unearthed an old chimney hidden behind a faux wall. Rather than mourning the extra work, I turned that discovery into an open, rustic feature—a nod to the home’s history that appraisers later saluted in dollar signs. It’s those ‘a-ha’ moments that can lead to substantial increases in your house equity.
The beauty of enhancing your real estate value isn’t just the result, but the journey there—humbled by a fluke find, or wowed by the wonders of wallpaper.
Convert an attic or basement into a lively, usable space—hello, a game room or a chic home office.
Knock out a non-structural wall to merge small, dark rooms into a light-flooded expanse.
Upgrade those tired fixtures in the bathroom or kitchen—minor changes that reek of modernity.
Such subtle shakes to the property’s bones can cause the property’s value to soar. Eyeballing a return on investment isn’t like gazing into a crystal ball. Instead, a magic number emerges from quality materials marrying novel design.
Restructuring Idea
Estimated Increase in Property Value
Cost of Implementation
ROI
Attic Conversion
10-15%
$20,000 – $30,000
It depends on the local real estate market
Removal of Non-Structural Walls
3-7%
$2,000 – $10,000
High
Bathroom and Kitchen Hardware Update
2-5%
$1,000 – $5,000
Moderate to High
It’s not just a renovation; it’s a renaissance that beckons more than aesthetic praise. It speaks to the foundation of what we do when we stitch new memories into the fabric of our old homes. With each calculated change, we’re coaxing a cocktail of history and modernity that intoxicates potential buyers.
And as for the feeling when you finally gaze upon your completed home makeover? Well, it’s akin to stepping inside the Sistine Chapel and realizing your ceiling might not rival Michelangelo’s, but hey, the value just spiked and your home suddenly became the neighborhood’s pièce de résistance.
Conclusion
As we wrap up our imaginative journey across the whimsical yet practical world of DIY home projects, it’s clear that the blend of personal satisfaction and the potential uptick in homeowner’s equity serves as a dual incentive. Embarking on home improvement endeavors not only bestows upon our domiciles a breath of fresh charisma but also whispers sweet numbers into the ears of the property market. For those still teetering on the precipice of the DIY universe, let this blog post—peppered with the essence of a mom blog—be your siren call.
The brush strokes of wit and determination have colored our canvases with techniques for elevating the real estate allure of our nests. Each nail hammered, each tile laid, and each wall painted imparts to the housing market and to our own hearts a testament to our creativity and labor of love. It turns out that in the realm of DIY home projects, the greatest masterpiece is the journey itself, and the equity accrued is but a delightful bonus. So, to my fellow homeowners, I say: Embrace your power drills, unfurl those blueprints, and let the allure of DIY magic enhance both your abode and your sense of fulfillment. After all, isn’t that what home is all about?
May your homes echo with laughter and your weekends be filled with the satisfying clang of improvement. To my fellow crafters of Sanctuary, who hold a paintbrush in one hand and a swatch book in the other—keep thriving. Through sweat, sawdust, and the occasional splatter, remember that the real treasure lies not just in the homeowner’s equity or the nod of approval from the housing market, but in the pride of proclaiming, “I did that!” So here’s to sawing deeper into the housing market with DIY vigor and hammering away with gusto on the anvil of real estate—all while you spin that improvement narrative in your cozy little corner of the world.
Manage your privacy
To provide the best experiences, we use technologies like cookies to store and/or access device information. Consenting to these technologies will allow us to process data such as browsing behavior or unique IDs on this site. Not consenting or withdrawing consent, may adversely affect certain features and functions.
Functional
Always active
The technical storage or access is strictly necessary for the legitimate purpose of enabling the use of a specific service explicitly requested by the subscriber or user, or for the sole purpose of carrying out the transmission of a communication over an electronic communications network.
Preferences
The technical storage or access is necessary for the legitimate purpose of storing preferences that are not requested by the subscriber or user.
Statistics
The technical storage or access that is used exclusively for statistical purposes.The technical storage or access that is used exclusively for anonymous statistical purposes. Without a subpoena, voluntary compliance on the part of your Internet Service Provider, or additional records from a third party, information stored or retrieved for this purpose alone cannot usually be used to identify you.
Marketing
The technical storage or access is required to create user profiles to send advertising, or to track the user on a website or across several websites for similar marketing purposes.